Beauty Products and Procedure Reviews by the Twins

WELCOME to Addicted-2-Beauty!

Welcome to our blog that will review and share our personal experiences with cosmetics, beauty products, fashion trends, and even cosmetic surgery.
Our goal with this blog is to help people get what they're looking for out of certain products, or achieve their desired beauty treatment.
Let us know if there's anything we can help you with and we'll do out best!
-J + A

5/21/2554

Sunglasses -fashion accessory and eye protection all-in-one!

GG <3s Ray Ban Clubmasters (pic credit to celeb clothingline)

Ray Ban Clubmasters
In the northern hemisphere summer is approaching and the suns harmful rays will be out in full force.  Sun can cause a great deal of problems for your peepers and  you've only got one pair of eyes, so you ought to protect them...in style of course! 


If you need a reason to shell out some big bucks for a quality pair of sunnies, here it is: Cheap sunglasses often offer very little or no UV protection and can do MORE damage than not wearing any sunglasses at all!(read more here ) Reason enough? I think so.
When it comes to choosing a style, there are so many to choose from.  Try on a few pairs and get your friends opinions.. and if they don't like them but you still love them, buy them anyways.  Just make sure your wearing the sunglasses and that they aren't wearing you.


Me in my Ray Bans
So what's in now? Ray Ban, Oakley, Retro Super Future, I find to be more funky and fun, but if you're looking for something more classy you might want to stick to designer brands like Prada, Chanel, Dior, and Gucci.


Recently I picked up a pair of Ray Ban Clubmaster's and I LOVE them.  They're very comfortable, fairly light, don't slide, and are just an all-around great pair of glasses.  They only cost around $155USD in Florida where I bought them (unfortunately in Bangkok I haven't seen them for less than 8000baht).


Just a few celebs spotted in Ray Ban Clubmasters (pic credit goes to thefashionstar.com)
What do you look for in a good pair of sunglasses? What brand or style are you liking at the moment?

5/20/2554

Longchamp Le Pliage -A Classic timeless tote!


Picture from londonharness.com
The Longchamp Le Pliage tote is a lightweight nylon bag so classic and versatile it'll never go out of style.  It comes in many sizes and colours and either short or long handles.  The Longchamp Le Pliage is not only fashionable -it's affordable! In the US a large size Le Pliage goes for around $150, making it a great option for those who aren't ready to invest a small fortune to purchase a handbag.  The Le Pliage is remarkably strong and easy to keep clean by using a washcloth with a mild soap and warm water to clean the nylon.  

Tip: If your Le Pliage is looking a bit floppy or frumpy, you can slip a stiff paper folder into the bottom to make it hold shape for more of a rectangular bottom.

In the last episode of Gossip Girl (S4E22) Charlie(Kaylee Defer) is seen holding an XL Le Pliage bag in graphite.
Picture from media16.onsugar.com
Other Celebs spotted using the Longchamp Le Pliage:
Keke Lindgard, Rachel McAdams, Katie Holmes, Kate Middleton, Whitney Port, Kate Moss and more. 

me using my black le pliage large tote
What are your thoughts on the longchamp le pliage? What bag do you think every lady should own?

Chinos!

Chinos!
The ever so comfortable slightly short pants are in this year.  Many celebs have been spotted wearing their favorite Chinos either with a cute pair of flats or a hot pair of heels to lengthen those legs.  They look great on all shapes and sizes and you can dress them up or down with with acessories. 
I just bought my first pair of chinos in black and I absolutely love them! I bought mine from Stradivarius 
On a casual day I pair them with a funky t-shirt and a pair of keds and a cute bag, while on a more formal day I pair them with a pair of peep-toe pumps and dressy top, cute acessories and a large black longchamp le pliage tote.


celebs rockin their chinos.  Picture from FashionTR


5/19/2554

Bourjois Mascara


This is my new favortie mascara! For anyone seeking a doey eye'd look - this is what I recommend. The mascara doesn't clump or fall and works very well on shorter lashes. 
a naked eye

After using Bourjois!
To use: Step 1 - apply with the smaller wand to coat and separate the lashes for maximum definition.
Small wand

            
           Step 2 - apply with larger wand for beautifully defined lashes with volume

big wand
Tell me what your favourite mascara is!

5/18/2554

fushion hair extensions... don't get them!

Last year I decided I was sick of having shoulder-length hair and started looking into my options.
 My options were:
1.  a weave, where the fake hair is braided into your natural hair. cons=uncomfortable to sleep with
2.  clip-in extensions, each piece of ectension clips in underneath your hair.  cons=time consuming
3.  fushion extensions, pieces of hair are glued on using a glue gun and special type of glue to your natural hair.  cons-none, or so I thought!


I found a salon that had somewhat of a reputable reputation in Bangkok and decided to give it a go.   The total cost was about 5000baht which is roughly $160USD...affordable for fusion extensions.
It took abotu 3hours to finish my hair and i walked out with beautiful long hair.

After the fushion extensions (my hair was at my shoulders before)


I didn't really start to notice problems till I washed my hair...
-The first thing i noticed is that the extensions were very heavy and weighing down my natural hair especially when wet.
-The extensions were made of asian hair and I'm caucasian, so my hair doesn't dry as fast and also doesn't dry straight.  I wasn't able to blow dry around the fused(glued) area because it could loosen the fushion.
-Styling was a major hassle.
-Couldn't put hair in an up-do because you could see the fushion underneath
1 week later i got the extensions removed
...waste of $160USD


I got them removed exactly one week later because I couldn't stand them any longer. After I got them removed I had to get a hair cut because the fushion had successfully damaged my hair.  Great! after wanting longer hair I end up with shorter hair. :(


I will NEVER subject myself to fushion extensions ever again and I'm warning you all that it will destroy your hair.  Clip-ins are the way to go.  I'll be posting about my new Lord & Cliff 18" 7 piece clip-in extensions in a few days and show you step by step how to apply them. 


What method of hair-lengthening have you tried (weave, clip-in extensions, fushion)?

5/14/2554

Eucerin Q10 Active Eye moisturizer + the Garnier Caffeine Roll-on = LIFESAVER

Over the years I've abused my skin with excessive tanning and noticed recently some fine lines beneath on the outter corners and beneath my eyes. After noticing the lines I was hysterical and immediately went on a search for a good eye cream, when I was directed by a pharmacist to Eucerin Q10 Active Eye I've been using it for roughly a month now in addition to the Garnier Caffeine Roll-on and have noticed visible results! I apply the Q10 active eye around my eyes to a clean face before bed and again in the morning after using the Garnier Caffiene Roll-on prior to applying my foundation. 
These two products have made my eyes look more youthful by reducing the lines and darkness circles around my eyes and more dewy beneath my eyes.  It's a miracle what getting ride of some lines can do for one's self-esteem.  I definitely will post pics of my eyes before using these products and 5 weeks later, so wait just a week and a bit and you'll be able to see the difference yourself.

Chanel Foundation and Powder

Chanel Vitalumiere Aqua Ultra-Light Skin Perfecting Makeup
& Chanel Poudre Universelle Libre Natural Finish Loose Powder <3


These are the first Chanel products I've ever purchased on my own, ad I don't regret shelling out the money for either.  Chanel make-up  is amazing quality! Since I've started using these, I've received so many compliments about my skin and "perfect" complexion.

The Chanel Vitalumiere Aqua Ultra-Light Skin Perfecting Make-up SPF 15 is great for hot weather because it's very light-weight and doesn't clog poors.  It provides a light-medium coverage, so it's great for letting your skin breath and makes your skin look flawless and natural.  This foundation also has 15spf, so it offers protection from skin damaging rays.
For best results apply a moisturizer before use. I use a moisturizer with spf all over my face and Eucerin Q10 Active Eye around my eyes before my foundation.

How to apply:
First shake the bottle well before using.  Make sure to apply to a clean face with clean hands.  Put several spots of foundation on your face (forehead, chin, under eyes, nose, cheeks, OR where needed if you are not fully covering your face), use a sponge, foundation brush, or your finger to spread the foundation around evenly taking care not to leave any streaks or revealing make-up lines around the side of your face, jaw, or forehead.  If you need more coverage, apply more to the desired areas. Once you are satisfied with your foundation, you can move on to apply a loose powder.


Chanel Poudre Universelle Libre Natural Finish Loose Powder
Every good foundation needs a finishing powder and this natural loose powder leaves you with the perfect finish.  This powder is great for all types of skin, it lightly covers because it's translucent, and leaves skin looking flawless and silky smooth. 
To apply:
While closed, turn case upside down and tap gently on the bottom of the case to loosen powder enough to fall onto the powder puff that is in the top part of the case.  Turn right-side up and open, remove powder puff and apply the powder with the puff gently all over the face.
You may want to use a powder brush instead of a puff; in such a case, I recommend opening the case and emptying just a little powder into the inside of the lid.  You can pick up the powder from the lid with your brush and dust it on your face as you see fit.

For those of you wondering which colours I use, I'm currently using Chanel Vitalumiere Aqua Ultra-Light Skin Perfecting Makeup in B20 Beige and Chanel Poudre Universelle Libre Natural Finish Powder in 20 Clair-Translucent 1.

John Frieda Go Blonder Lightening Shampoo and Conditioner

I'd been at odds with my hair for a while wanting to lighten it but scared to destroy it after an incident 6 months earlier with a bad hair dresser that left my hair so fried it basically was just breaking off in pieces. My roots were coming in an ash blond which didn't match the ends which were a more brassy dark blond-brown colour. 
So I was in the Wall Greens and came across the Sheer Blonde Go Blonder Lightening Shampoo by John Frieda and decided to give it a try. The smell is great and refreshing and I leave both the shampoo and conditioner on for 10 minutes each before rinsing to increase the lightening outcome.  My only complaint about this product is that it leaves the hair feeling dry, so I use Shiseido Tsubaki Treatment once I rinse the Go Blonder conditioner which leaves my hair feeling soft and silky.  The best thing about this product is that it is peroxide and ammonia-free, so it safely lightens hair. 

Two months into using both John Frieda's Sheer Blonde Go Blonder shampoo and Go Blonder conditioner consistantly I can see major results.
^Before                                                                                                  After 2 months of Go Blonder^

Let me know what you think of the results and your experience with John Frieda's Sheer Blonde Go Blonder Shampoo and Condition by leaving me a comment :)

5/11/2554

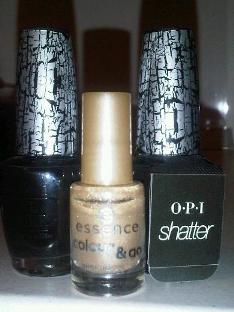
O.P.I Black Shatter Nail Polish


I visited Florida last month and was able to pick up a few bottles of O.P.I's black shatter nail polish! It cost me about US $8.50 per bottle but was well worth it.  It works best with a light-coloured or metallic-coloured base coat.  
To use:
First apply the base coat, 1 or 2 coats depending on how dramatic you want the colour.  Wait for the base colour to dry completely before using the shatters. Once the base colour is dry, you can paint a coat of black shatters polish over your base-colour, for a very shattered effect paint nails lightly with the shatters polish.  Similarly, for less "breaks" in the shattered polish, use a thicker coat.  The O.P.I black shatters nail polish looks best with a top coat, because the black polish itself is VERY matte.  So once the shatters is dry, apply a glossy top coat for a finished look.


The best thing about this polish is that even if it's applied messy, it's still a great look! It's a fun and easy way to make you're nails look stylish without having to go through the trouble of getting decals and junk put on them.  Great for any occassion.  My best buy in Florida!
-J